If you searched for how to record screen with facecam, the real job is not just turning on a camera. You need the screen action, webcam bubble, microphone, app sound, cursor movement, and final export to work together without covering the thing you are trying to teach.
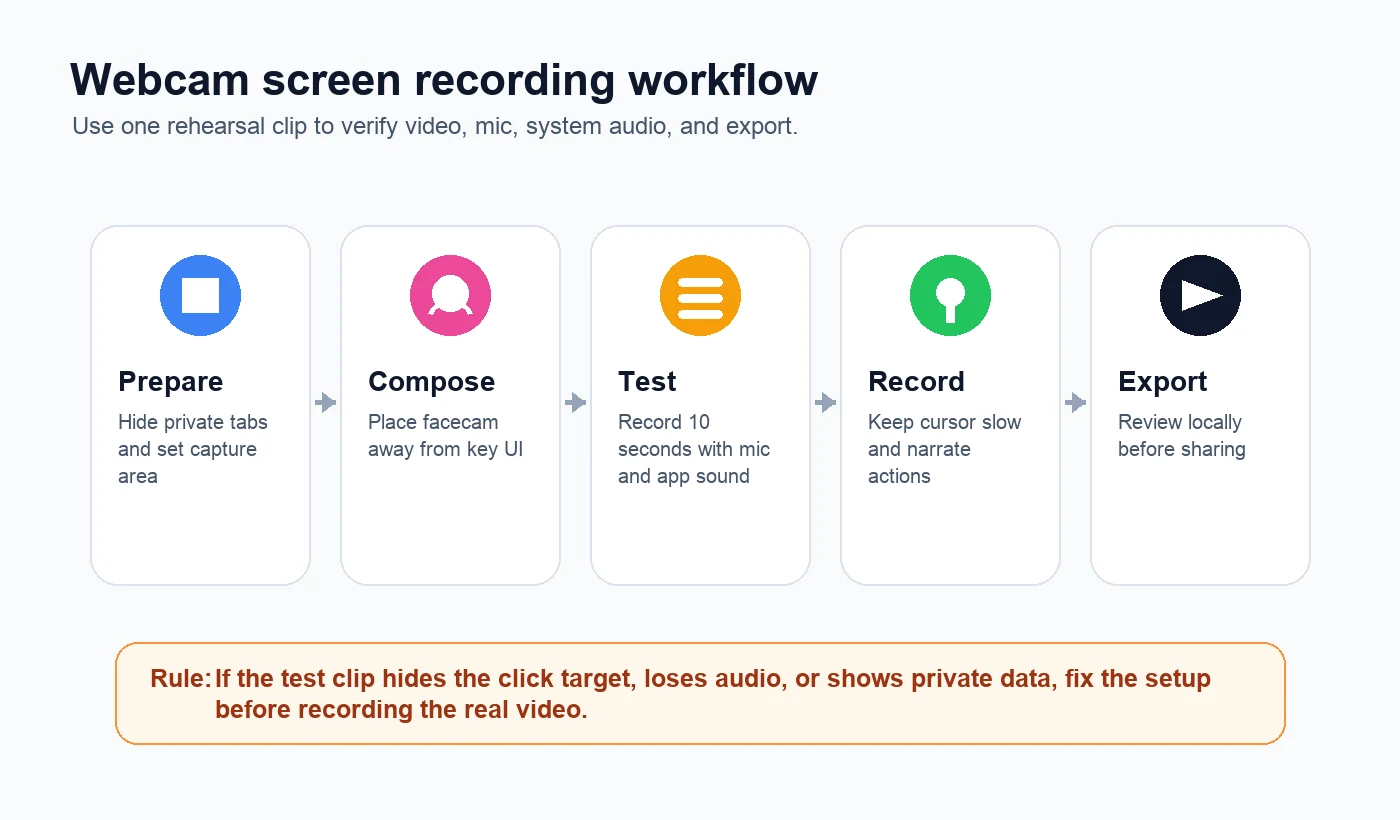
The fastest safe workflow is simple: compose the facecam first, record a 10-second test, listen to the export, then record the real tutorial. That habit catches the two problems that ruin most facecam recordings: hidden UI and missing audio.
Start with the right facecam setup
Use this table before opening any recorder.
| Recording job | Facecam layout | Audio check | Best Redol fit |
|---|---|---|---|
| Product walkthrough | Small corner bubble away from menus and buttons | Mic plus app sound if the product makes noise | Strong fit for Mac screen, webcam overlay, system audio, and local export |
| Course lesson | Camera near the slide edge, not over captions | Mic first, system audio only when needed | Strong fit when you want repeatable Mac recordings |
| Support video | Tiny bubble or no bubble if privacy matters | Mic narration is usually enough | Good fit when the clip should stay local |
| Gameplay or live-style recording | Larger camera with more scene control | Mic, game sound, and careful balancing | Use a dedicated broadcast-style tool if scenes matter more than speed |
What a facecam screen recording needs
A useful facecam recording has four parts:
- Visible action: the viewer can see every click, menu, and field you mention.
- Intentional camera placement: your facecam supports trust and explanation without hiding the lesson.
- Clean audio: microphone narration is clear, and system audio is included only when it helps.
- Local review: you can watch the exported file before sending it to customers, students, or teammates.
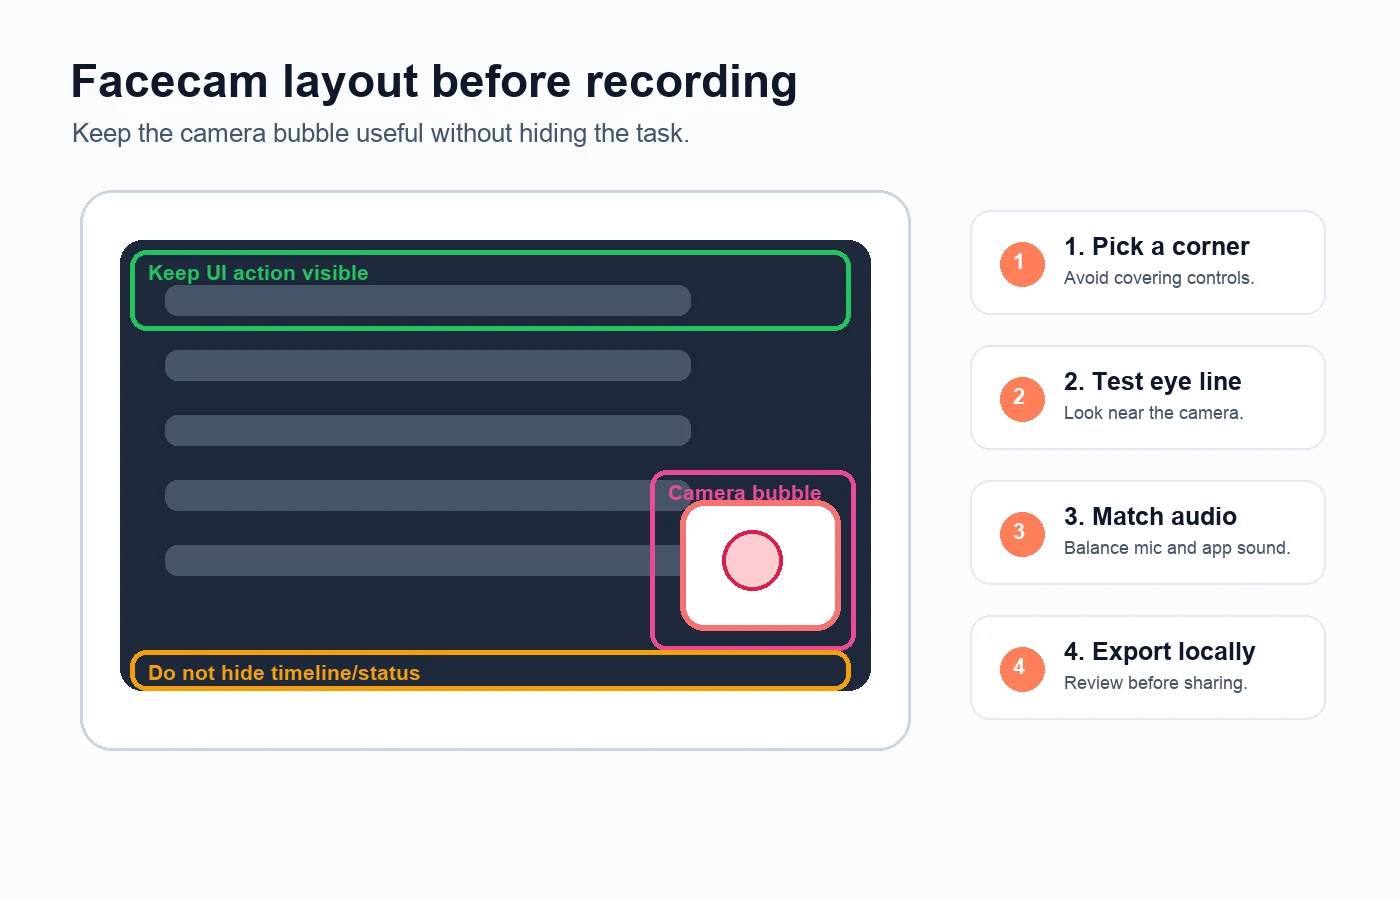
The easiest mistake is placing the facecam where it looks good at the start, then discovering it covers the button, caption, or timeline later. Put the facecam in the least important corner, record a short test, and scrub through the section where you click or demonstrate the main action.
Use a built-in Mac recorder for quick voice clips
Apple documents the built-in Mac screen recording flow in its official screen recording guide. Screenshot and QuickTime are good enough when you need a fast screen clip with microphone narration and do not need an integrated camera overlay.
Use the built-in route when:
- You only need to show the screen.
- A separate facecam bubble is not required.
- Microphone narration is enough.
- You can accept a simple recording workflow with minimal editing control.
If the video needs a webcam overlay, crop control, cursor emphasis, system audio, and a clean local MP4 export, a dedicated recorder is usually a better fit.
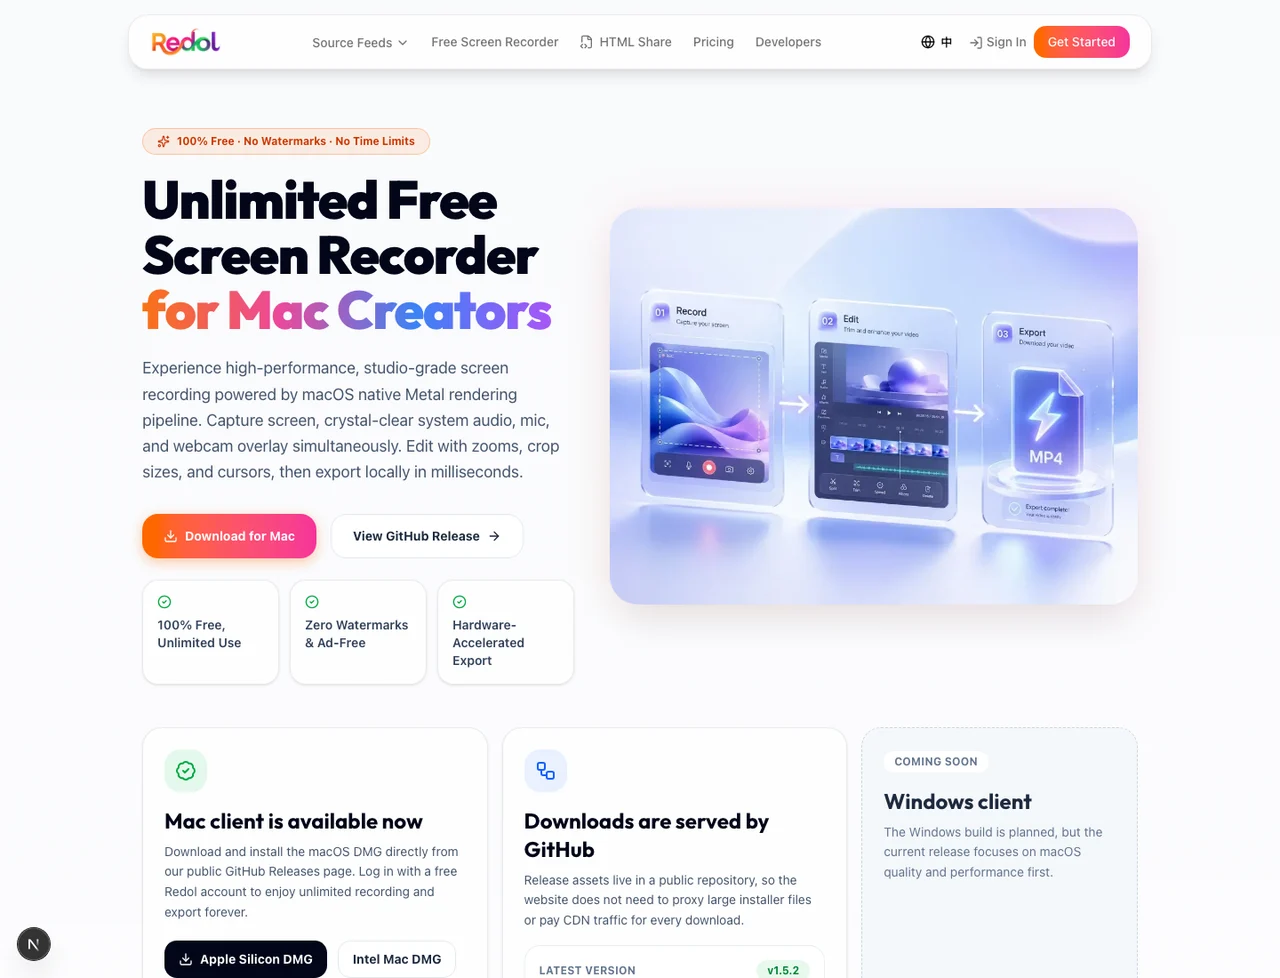
Record screen and facecam with Redol on Mac
Redol Screen Recorder is a Mac-first recorder built for local, no-watermark screen captures. The current product page presents support for screen capture, system audio, microphone narration, webcam overlay, zooms, crop sizing, cursor actions, and local export. It also shows the Windows client as planned rather than live, so keep this workflow Mac-specific for now.
Use Redol when the facecam recording is meant to become a real asset:
- Open the recorder and choose the screen, window, or custom capture area.
- Turn on the webcam overlay and place it away from the main UI action.
- Select the microphone you will narrate with.
- Enable system audio only if the app sound matters to the lesson.
- Record 10 seconds and export the test clip.
- Watch the test clip for hidden UI, missing audio, private data, and awkward camera placement.
- Record the final version after the test passes.
This is especially useful for product demos, customer support walkthroughs, async team updates, course modules, and software tutorials. Those videos need a clean result more than they need a complicated broadcast setup.
Record your screen with a clean webcam overlay
Use Redol Screen Recorder for local Mac captures with webcam overlay, mic, system audio, crop controls, cursor actions, and no-watermark export.
Run a 10-second test before the real take
The test clip is the quality gate. It should include one spoken sentence, one cursor movement, one click near the facecam bubble, and one short app sound if system audio matters.
Check these things before recording anything long:
- Facecam placement: the camera bubble does not hide menus, buttons, captions, or the timeline.
- Eye line: your camera position feels natural enough for the video format.
- Mic level: your voice is easy to understand without peaking.
- System audio: app sound appears only when you need it and does not overpower narration.
- Cursor pace: cursor movement is slow enough for viewers to follow.
- Privacy: notifications, private tabs, customer names, and account details are hidden.
- Export: the saved file opens locally and has the expected resolution and format.
If the test fails, fix the setup rather than promising yourself you will edit around it later.
Common facecam recording mistakes
| Mistake | Why it hurts the video | Fix |
|---|---|---|
| Camera covers the click target | Viewers cannot see the action you are explaining | Move the bubble before recording |
| Facecam is too large | The video becomes about the speaker, not the task | Use a small corner bubble for tutorials |
| Mic is clear but app sound is missing | The viewer cannot hear the event you reference | Enable system audio and retest |
| System audio overpowers narration | The explanation becomes hard to follow | Lower app volume before recording |
| Notifications appear | Private or distracting information leaks into the asset | Turn on Focus and close private apps |
| No local review | A silent or blocked recording gets shared too late | Export and watch the test clip first |
For a deeper audio-specific setup, use the existing Redol guide to screen record on Mac with audio. If your main requirement is no-watermark export across recorder options, compare the best free screen recorders without watermarks.
Final recommendation
For a quick screen-only voice clip, the built-in Mac recorder is enough. For a polished Mac tutorial with facecam, microphone narration, optional system audio, cursor clarity, local export, and no watermark, use Redol Screen Recorder.
The winning habit is not a feature. It is the rehearsal clip: place the facecam, record 10 seconds, listen back, check the UI, and only then record the video your audience will actually see.
Related posts
About the Author
Zhang Guo
AI Product Manager · Digital Marketing Consultant
AI product manager and digital marketing consultant with a background in music. I see creativity as the bridge between rhythm and logic, where musical intuition and mathematical precision can coexist in every meaningful product decision.
Follow on X