Topic: Screen recording guides
To record an iPhone screen on a Mac, connect the iPhone with a data-capable cable, approve the connection on both devices, and open QuickTime Player. Choose File > New Movie Recording, open the capture-device menu, select the connected iPhone as the camera, choose the microphone and quality, then press Record. QuickTime saves the finished movie on the Mac.
That wired QuickTime method is the best default when the recording must land on the Mac immediately. If you only need a simple iPhone clip, use the iPhone's built-in Screen Recording control and AirDrop the result instead. If the phone is already mirrored to the Mac and you need Mac narration, webcam, or a larger tutorial frame, record the Mac-side window with a desktop recorder after a short test.
Choose the Right iPhone-to-Mac Recording Method
| Your task | Best method | Main tradeoff |
|---|---|---|
| Capture the live iPhone display directly into a Mac file | Wired QuickTime movie recording | Requires a data-capable cable and device trust |
| Make a quick clip without keeping the iPhone connected | Built-in iPhone Screen Recording, then AirDrop | The recording begins and ends on the phone |
| Add Mac narration, webcam, crop, or a desktop tutorial frame | Mirror or preview the iPhone on Mac, then record the Mac window | Requires a compatible mirroring path and a test for protected content |
| Control the iPhone from the Mac while demonstrating an app | iPhone Mirroring, then a Mac-side recording workflow | Apple account, OS, region, proximity, and app restrictions apply |
Record the iPhone Screen with QuickTime
Apple's current QuickTime Player guide documents a connected-device workflow for capturing what appears on an iPhone, iPad, or iPod touch and saving it as a movie file on the Mac.
- Unlock the iPhone and connect it to the Mac with a USB-C or Lightning cable that supports data, not only charging.
- If the Mac asks whether to allow the accessory, choose Allow. If the iPhone asks whether to trust the computer, tap Trust and enter the passcode.
- Open QuickTime Player on the Mac.
- Choose File > New Movie Recording. Do not choose New Screen Recording; that command records the Mac display.
- Open the capture-device menu next to the Record button.
- Under Camera, select the connected iPhone.
- Under Microphone, select the audio source you want. Under Quality, choose High or Maximum.
- Confirm that the QuickTime preview follows the iPhone screen, then press Record.
- Perform the iPhone task, stop the recording, and choose File > Save.
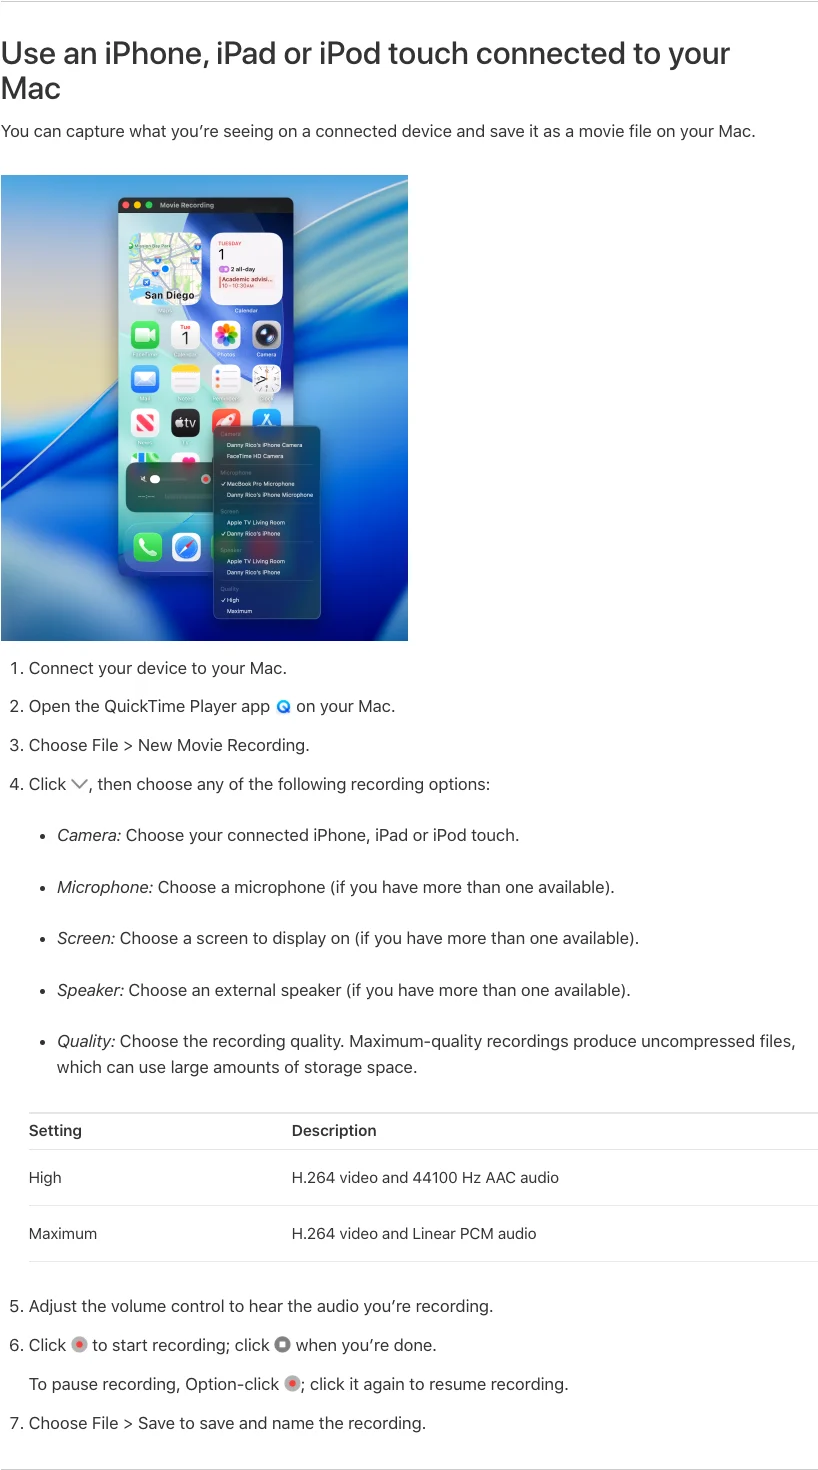
Apple lists H.264 video for both quality options in the connected-device workflow. High uses AAC audio, while Maximum uses Linear PCM audio and can create much larger files. Use High for routine tutorials and support clips. Reserve Maximum for footage that will go through a heavier editing workflow and has enough storage available.
Choose the Right Audio Source
The camera and microphone menus solve different parts of the recording:
- Camera: iPhone selects the phone display as the video source.
- Microphone: iPhone can capture the audio source exposed by the connected device.
- Microphone: Mac microphone or external mic is the clearer choice when you are narrating a tutorial from the desk.
- Quality: High keeps files more manageable for ordinary walkthroughs.
- Quality: Maximum favors editing headroom over file size.
Record 15 seconds before the real take. Speak one sentence, trigger one app sound, stop, save, and play the file. That small test catches a silent microphone, the wrong input, a loose cable, an app that restricts capture, or a file that is much larger than expected.
Do not assume protected video or audio can be recorded just because the iPhone preview is visible. Some apps restrict capture or mirroring. Use a rights-safe test screen and never design the workflow around bypassing an app's protection.
Fix an iPhone That Does Not Appear in QuickTime
If the iPhone is missing from the camera menu, treat it as a connection problem before reinstalling software.
- Unlock the iPhone, disconnect it, and reconnect it.
- Confirm that the cable supports data. A charge-only cable can power the phone without exposing it to QuickTime.
- Approve Allow accessory to connect on the Mac and Trust This Computer on the iPhone.
- Open Finder and check whether the iPhone appears in the sidebar. If Finder cannot see it, QuickTime is unlikely to see it either.
- Try another cable and another Mac port, avoiding an unreliable hub.
- Quit and reopen QuickTime after the iPhone is recognized.
- Update macOS and iOS if the connection remains unavailable.
Apple's device-recognition troubleshooting guide recommends the same core checks: approve the accessory, trust the computer, verify a data-capable cable, try another port, and update both devices. If you previously tapped Don't Trust, Apple's Trust This Computer guide explains how to reset Location & Privacy so the prompt can appear again.
When On-Device Recording Is Simpler
QuickTime is useful because the file is created on the Mac and the iPhone display can stay visible in a desktop workflow. It is unnecessary when you only need a short clip from the phone.
For an iPhone-only task, follow the built-in iPhone screen recording workflow. Record on the phone, verify the audio in Photos, trim the beginning and end, then AirDrop the finished clip to the Mac. Apple's QuickTime guide explicitly identifies on-device recording plus AirDrop as the wireless alternative.
Choose the on-device path when:
- a cable would get in the way
- the clip does not need live Mac narration or webcam framing
- you want to trim in Photos before transferring
- the Mac is only the final storage or editing destination
Choose QuickTime when the phone needs to stay inside a Mac production workflow from the start.
When a Mac Screen Recorder Adds Value
QuickTime records the iPhone feed cleanly, but it is not a full desktop tutorial layout. A Mac screen recorder becomes useful when the iPhone preview is only one part of the final frame: for example, a presenter webcam, a browser reference, a support checklist, or narration recorded alongside the phone demonstration.
Redol Screen Recorder can record a selected Mac window or area with system audio, microphone narration, a webcam overlay, cursor emphasis, zooms, crop controls, and local MP4 export. It is currently an Apple Silicon Mac product. It does not record an iPhone directly; the iPhone must first be visible on the Mac through QuickTime, AirPlay, or another legitimate mirroring path.
For wireless display, Apple's AirPlay mirroring guide says the iPhone and Mac must be on the same Wi-Fi network. Apple's separate iPhone Mirroring guide documents stricter requirements, including compatible macOS and iOS versions, the same Apple Account with two-factor authentication, Bluetooth and Wi-Fi, and a nearby locked iPhone. Some regions and apps impose additional limits.
Use this Mac-side path only after a test confirms that the mirrored content is recordable and that the audio route is correct. For tighter framing, the partial-screen recording guide explains how to isolate one Mac area without exposing the rest of the desktop.
Turn the iPhone preview into a narrated Mac tutorial
Use Redol Screen Recorder on Apple Silicon Mac when the final video needs a selected capture area, microphone narration, webcam overlay, quick edits, and local MP4 export.
Run a Privacy and Quality Preflight
An iPhone demonstration can expose notifications, account names, personal photos, messages, health information, or customer data. Run this checklist before recording:
- Turn on Focus on both the iPhone and Mac.
- Close private Mac windows and hide unrelated browser tabs.
- Use a demonstration account or privacy-safe screen when possible.
- Lock the iPhone orientation if the tutorial should stay portrait or landscape.
- Choose the microphone and quality before pressing Record.
- Capture and review a 15-second test file with sound.
- Check free Mac storage, especially before choosing Maximum quality.
- Watch the final export at full size before sharing it.
The safest workflow is also the fastest to repeat: establish trust, choose the right source, record a short test, then capture the real task.
Final Recommendation
Use QuickTime for the most direct answer to how to record iPhone screen on Mac. It is built into macOS, records a connected iPhone as a movie source, lets you choose the microphone and quality, and saves the result on the Mac.
Use the iPhone's built-in recorder plus AirDrop when the Mac is only the destination. Use a Mac screen recorder when the phone display must become part of a larger desktop tutorial with narration, webcam, crop, or local editing. Keep those jobs separate and test the exact audio and app before the real take.
Related posts
About the Author

Zhang Guo
AI Product Manager · Digital Marketing Consultant
AI product manager and digital marketing consultant with a background in music. I see creativity as the bridge between rhythm and logic, where musical intuition and mathematical precision can coexist in every meaningful product decision.
Follow on X